Tutorial
The tutorial is written for someone with a decent understanding of C++, a passing understanding of traditional unit testing and of diff tools, and no experience with Approval Tests at all.
In this tutorial, we are going to use Windows, Catch2 and WinMerge. If you are using something else, it will make almost no difference to your experience.
By the end of this tutorial, you should be able to use Approval Tests in most basic cases.
To follow along at home, please download the Starter Project unless you already have a working ApprovalTests build / environment in which case you can just start a new test.
Hello Approval Tests
Let’s open the Starter Project in your development environment, and open Tutorial.cpp.
Writing the Test
Let’s add our first test:
TEST_CASE("HelloApprovals")
{
    ApprovalTests::Approvals::verify("Hello Approvals");
}
(See snippet source)
Approving the Test
When we run the test, WinMerge will open as such:
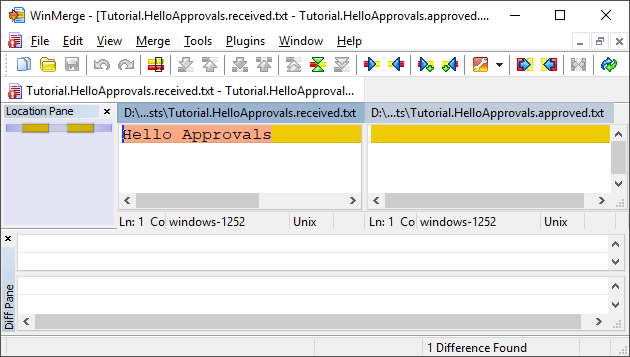
New Failure
On the left hand side, we will see the actual received result,
Hello Approvals. It is what we want, so we are going to approve it.
To do that, click the “All Right” button (or copy and paste the text to
the other side)
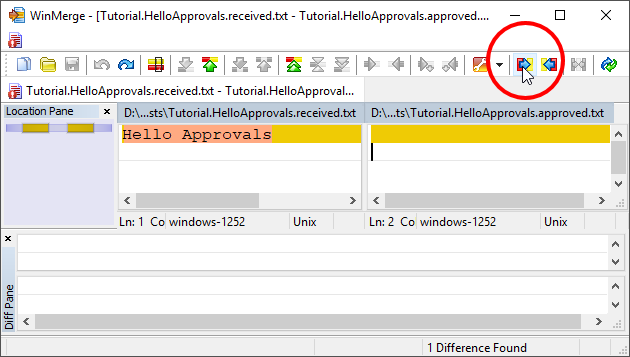
Approving
Afterwards, the two sides should be identical.
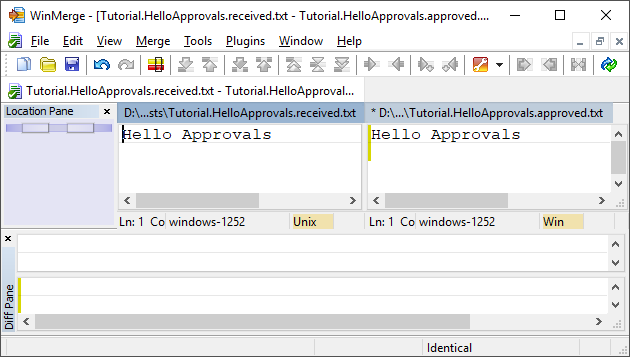
Approved
Now save the file and close the Diff Tool.
Now, when you re-run the tests, two things should happen:
The test should pass
The Diff Tool should NOT open.
What just happened?
Approval Tests keeps its expected result in an external file. When you run the test, it reads this file to do its verification.
If it matches, the test passes, and everything is finished.
However, if it does not match, another step is invoked, and a “Reporter” (the Diff Tool) is launched. This allows you to easily view and gain insight in to what happened and decide what you want to happen.
Please note that the first time you run an Approval Test, it will always fail and launch a reporter, as you have never said anything is OK.
Approval Files
Approvals creates a lot of .approved.txt and .received.txt
files. The .received.txt files are automatically deleted on a
passing test, and should never be checked in to source control. We
suggest adding *.received.* line to your .gitignore file.
The .approved.txt files, on the other hand, need to be checked in to
your source control.
Approval Tests follows the Convention over Configuration rule. The convention used for our files is as follows:
FileName.TestName.approved.txt
So in this case, it will be:
Tutorial.HelloApprovals.approved.txt
It will be located in the same directory as your tests. (This is configurable).
The ApprovalTests namespace
In all other code examples in this site, have already included the code:
using namespace ApprovalTests;
(See snippet source)
… So that code samples are simpler and easier to read. This is a recommended practice in your tests.
Approving Objects
The above example is a bit simplistic. Normally, you will want to test
actual objects from your code base. To explore this, let’s create an
object called LibraryBook:
class LibraryBook
{
public:
    LibraryBook(std::string title_,
                std::string author_,
                int available_copies_,
                std::string language_,
                int pages_,
                std::string isbn_)
        : title(title_)
        , author(author_)
        , available_copies(available_copies_)
        , language(language_)
        , pages(pages_)
        , isbn(isbn_)
    {
    }
    // Data public for simplicity of test demo case.
    // In production code, we would have accessors instead.
    std::string title;
    std::string author;
    int available_copies;
    std::string language;
    int pages;
    std::string isbn;
};
(See snippet source)
What we would like to be able to write is:
LibraryBook harry_potter(
    "Harry Potter and the Goblet of Fire", "J.K. Rowling",
    30, "English", 752, "978-0439139595");

Approvals::verify(harry_potter); // This does not compile
(See snippet source)
The problem is that this will not compile, because at present there is no way to turn the LibraryBook in to a string representation.
So we are going to add a lambda to handle the printing.
Let’s start by just printing the title:
Approvals::verify(harry_potter, [](const LibraryBook& b, std::ostream& os) {
    os << "title: " << b.title;
});
(See snippet source)
There’s a lot going on here, so let’s break it down:
Lambda:
[](const LibraryBook& b, std::ostream& os){}. This is the call-back function to convert your object to a string. Note that you can also write this as[](auto b, auto& os){}toString:
os << "title: " << b.title;- this is the bit of code that actually turns our object in to a string.
This works, but of course, there is a lot more that we want to look at
than the title. So let’s expand the toString:
Approvals::verify(harry_potter, [](const LibraryBook& b, std::ostream& os) {
    os << "title: " << b.title << "\n"
       << "author: " << b.author << "\n"
       << "available_copies: " << b.available_copies << "\n"
       << "language: " << b.language << "\n"
       << "pages: " << b.pages << "\n"
       << "isbn: " << b.isbn << "\n";
});
(See snippet source)
When you run and approve this, you will end up with the approval file:
title: Harry Potter and the Goblet of Fire
author: J.K. Rowling
available_copies: 30
language: English
pages: 752
isbn: 978-0439139595
(See snippet source)
If you would like to know how to do this more robustly, check out To String.
Dealing with test failures
Every change in behaviour is not necessarily a failure, but every change in behaviour will fail the test.
There are three parts to dealing with failure.
Identify what changed
Either:
Fix the code, if the change was not intentional
Re-approve the test, if you want the new behaviour
If you are in a refactoring mode, changes in Approval Tests output files are usually unintended, and a sign that you might have made a mistake.
If you are adding a new feature, changes in Approval Tests output files are often intended, and a sign that you should review and maybe accept the modified output.